Pinched and Creased

This is the last post I am going to do on my metal folding project. In the end I did 70 samples all together. I’m just showing you the best and most interesting ones.

These examples include the last couple of techniques I used. They are more of the decorative kind than structural.
IMG_3876IMG_4272
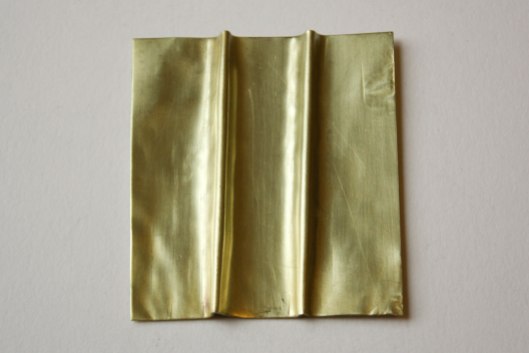
This next one was done using the fold forming technique where you fold the metal around a thin strip of metal, then feed it through the rolling mill multiple times till the whole thing is the same thickness. This causes the part with the metal strip to stretch and curve. When you unfold the metal it then has a curved raised fold through the centre.
IMG_4283This was a very interesting technique to experiment with – I tried using different widths of metal for the strip inside as well as cutting the strip of at different points – however I am not sure I actually like this effect.IMG_4284This last technique is currently my favorite. It is called a pinched line fold. The metal is folded in half by hand and then hit just behind and then upon the fold in the centre with a hammer. This stretches and thins the metal at this point so that when the metal is unfolded there is a thin and gradual raised bit in the centre.IMG_4305IMG_4306IMG_4313
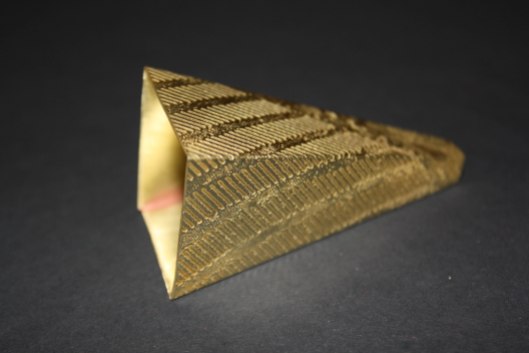
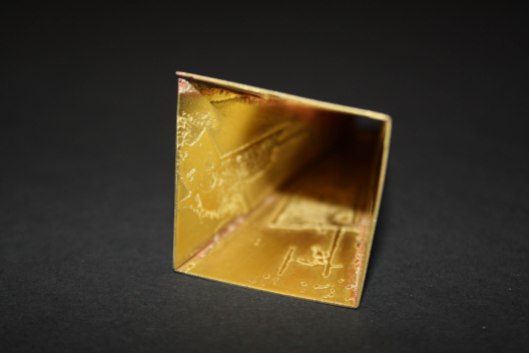
This technique produces a pinched and creased affect which is aesthetically interesting both front and back.IMG_4315The most interesting thing about all of these techniques, as part of this project, is that they can’t be reproduced in paper – they are unique to metal.

I hope to use the pinched line technique in my next project, I will be posting about it soon.

Two Folds

These are developments of my metal folding experiments, using the wire scoring technique and testing out the effectiveness when doing more than one fold within a square.

Parallel Folds:
IMG_3979IMG_3985Not only did I test the effectiveness of this technique when folding the metal twice but I also compared the results of this with both straight and curved folds.
I found the straight folds to be easier to control as you can use the edges of steel blocks and other tools to shape the corners around. With curved folds this is not possible, once one scored line is folded it is difficult to fold along the other.

Meeting Folds:IMG_4035IMG_4023Having said that curved folds were harder I actually found them easier in the meeting lines samples. The metal bent along the lines easily and naturally.
I am starting to understand the nature and limitations of folding metal but it is something which can only be learnt from experience and I still have a long way to go.

Crossing Folds:
IMG_4004IMG_4005IMG_4011This idea of crossing folds was an interesting one. If this was attempted in paper it would not hold any shape, it can not be bent both ways at the same time. However, metal is much stiffer and holds it shape. By working the folds a few times I was able to create this more decorative form with subtler folds.
It was much easier and a bit more effective with the straight lines but the curved lines one is still interesting.

Other:
IMG_4052IMG_4055I did a few more samples with two folds, including ones which combined straight and curved lines, but this was the most successful one. Like the curved meeting folds sample it bent naturally along the scored lines and created a smooth form which was very pleasing to the eye.

Paper to Metal

A large part of why I chose to explore folds in metal was because of how much work I have done in the past with paper. During both my Foundation year and the first year of my degree I did a lot of work in paper, card and acetate. In my latest project, making the corridors, I made lots of maquettes in different papers and cards but then struggled in understanding how to replicate these forms in metal.

I did succeed in making my ‘corridors’ in metal however I felt that to push the designs forward and make more varied pieces, like I had in paper, I would need have a better understanding of how differently metal and paper need to be treated.

Therefore, it made sense to do a section of my metal folding project comparing the results of a few paper-folding techniques in both card and brass.
1With both the card and metal I scored the lines first and then bent along them accordingly. I used the wire scoring technique to do the brass samples.
With this first form I found the results to be very similar.
234With this second paper-folding technique I had to work a lot harder on the metal however the result was still very similar the only significant difference being the loss of the point in the centre of the metal where all the lines meet.5678With this last pair the results were really quite different. Again, the main difficulty was with recreating the point in the centre where all the lines meet. Although this was the least successful in the recreation the result was still interesting and effective.910During the project I didn’t have time to test out these techniques in copper but I would still be interested in comparing the results as copper is so much softer than brass.

Folding Metal

It was very nice to arrive back at Hereford after a fantastic trip to Paris to then be able to go straight to my laptop to find out that I received 80 on my most recent project on folds in metal.
IMG_3949This project was about exploring a technique or process, to become an expert in it and push the boundaries. I chose folds in metal due to this project starting half way through the gallery one, by that point I knew folds were going to be involved so one project could inform the other. This helped a lot in the creation of my ‘corridors’.IMG_3946To start my investigation I had to research and test out simple techniques of scoring and folding metal. These first three images show a square of copper I scored be hand using a scribe and needle files. This was the most time-consuming process, however, it was also the one that produced the best sharply angled fold.IMG_3944To produce the fold in this square of brass I used the planish scoring technique, hitting the metal with a hammer against the sharp edge of a steel block. This produced a similar fold to the hand scoring technique, yet it was much quicker. However, it was harder to control and marked the metal slightly. A very crisp edge is needed!IMG_4218After initial tests I used the wire scoring technique, shown in the final two images, to experiment more playfully. This technique does not produce as sharp edges, however, it is fairly quick and very good for creating curved folds.IMG_4251IMG_4158A lot has happened this past week; visiting Paris for a few days, receiving my result for Advanced Processes, celebrating my 21st birthday and doing my first day of volunteering at Mission Gallery. Crazy!

Now or Never

I think it’s a case of now or never with this post! I finished this project quite a while ago now and another deadline has come and gone without me posting any finished pieces.

So here we go:IMG_3165In the end I made both objects and jewellery (there are two other pieces than these but I feel these are the most successful).IMG_3161IMG_3188I am really pleased with these but working out the best way to make them was hell! If I’d had the time I would have liked to make more varied ‘corridors’ with steeper curves and different lengths of edges. I was also planning on blackening the insides of some.14IMG_3186IMG_3183IMG_3174This is one of the necklaces, however it’s actually inspired by the bricks of MIMA rather than corridors. It’s simple but effective and I rather like wearing it myself.IMG_3215
After a very stressful finish to this project I managed to scrape a first! Woo!

Anyway, I’m off to Paris for a few days. I will try to be less useless once I’m back and post some examples from my Metal Folds project which finished earlier this week and will hopefully have my results for it as soon as I’m home.

Result!

Just two days ago I was moving out of my student house in Hereford. It’s hard to believe my first year has finished!

Since returning home I have received a letter confirming my results. For my final project, the work below, I received 80! A very good 1st.
DSCN9658
DSCN9660DSCN9665
Obviously I am very pleased with my result but, although the project itself was very successful, I will admit I was a little disappointed that the actual final necklace wasn’t completely successful. You can see this below.
DSCN9662
Having said that I still think elements of it are very effective and the initial design very clever.

My overall mark for the whole year is 1st. Yay!

Rocky Patterns and Etched Brass

I’ve been very busy since returning from Scotland. So I am very sorry for taking so long to post again.

Whilst in Scotland I collected rocks which interested me and I have done drawings of the patterns in the rocks. I am hoping to use these patterns within the necklace design I have been working on (which I will show you in the next post).
IMG_2757
IMG_2758IMG_2759IMG_2760
I haven’t decided what material I am going to make my necklace out of yet however there are many ways in which I can apply these patterns. One way is to etch it onto metal.
IMG_2741
I chose one of my drawings to etch. I repeated and flipped the pattern and printed it onto acetate to transfer it onto the metal which was then placed into acid. This etched the pattern into the metal. I chose brass because it looks good with wood which I am considering combining it with.
IMG_2742
This was quite a large design so it hasn’t etched very deep. However it is still quite effective, especially when the light catches the pattern.
IMG_2743

Fluxing Metal

I am currently enjoying my Easter holiday. Tomorrow I will be off to Middlesbrough and then Scotland on Thursday therefore I will probably not be posting much for the next 2 weeks.

However, here are the last metal samples I made on the first part of the 50 Words 50 Images project, for which I got another 1st! Woohoo!
IMG_9704
To create these pieces I soldered together geometrical shapes of copper and brass. To create the surfaces I painted the metal with flux and then heated them with a torch – this caused the beautiful colours and unpredictable patterns.
IMG_9701IMG_9708IMG_9699IMG_9711
I am hoping that for the next part of the 50 Words 50 Images project I will be able to develop these designs and techniques into more 3D piece which could perhaps be worn as jewellery. So far these could make rather nice brooches!

Hot Metal

Metal is definitely one of my favourite materials to play with!
Isn’t it amazing what you can do with it if you just apply enough heat and pressure.
These next three images are of two sample which I created simply by heating brass with a torch until the metal began to reticulate.DSCN9375DSCN9376DSCN9371

I have technically just finished this project however it actually leads straight on to the next one. In this last project I had to identify elements of my work, by producing samples, which I then intend to carry forth into my next project. Some of the elements I wish to continue working with can be seen in these next samples:

Triangles, layers and contrasting surfaces.
DSCN9368DSCN9370
Folds, textures and warm colours:
DSCN9388DSCN9380
Some other ideas I have been working with which i would like to develop in this next project are windows and combining materials – particularly metal and thread.

Feeling Pretty Pleased!

Thought I’d post these photos of my salt spoons displayed together as I think they look great and I’m really pleased with them.IMG_9556These photos also show the great finish on the spoons. I used antiquing fluid to give them a less harsh colour and surface. It also really emphasizes the extra lines I created.IMG_9558IMG_9557I have another reason to be pleased. Yesterday I got my results and feedback for ExM (Exploration of Materials) and the Spoons project…….
I got a 1st!!!

This is the display of my work for this project:
DSCN9255DSCN9256I have also had a 1st in the two other modules I have completed so far! It will be fantastic if I can keep this up!