What a Year!

Hello and Happy New Year.

This is my first time writing a blog post in over a year and it is also my first time posting on my blog at it’s new location on my website.

(If you followed my blog as it was before – hduncancreations.wordpress.com – please note that whilst it is still currently active I will no longer be posting on it. Instead you can continue to follow me here. Please subscribe.
You can also follow me on my Facebook page: www.facebook.com/HannahDuncanCreations)

A lot has happened since I wrote my last post – including me completing my degree. Therefore, today’s post will give you a brief overview of the highlights of my past year.

In March my classmates and I exhibited some of our work in De Koffie Pot, Hereford. Below is my display.

mar-17
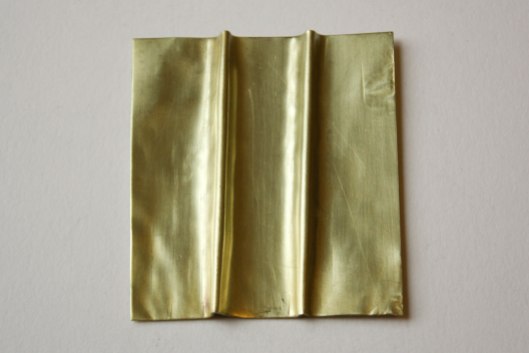
If you followed my blog before you may have noticed a considerable change in my work since the 2nd year of my degree. Over this past year I have developed a love for enameling – this photo shows the beginnings of my experiments with it as part of my work based on a coastal area of Scotland.

I developed my enameling skills and designs over the next few months to achieve my final outcomes for the degree show. The show was held at Hereford College of Arts in June.

june
After the stress of all my deadlines was over I was very excited to be able to take part in an enameling workshop run by Elizabeth Turrell.

????????????????????????????????????

Then at the end of June some of us packed up our degree work to take to London for New Designers. It was a bit manic but well worth it!

new-designers-june-july
On July 22nd I finally graduated!

july-22
I had a less than perfect college experience, especially in this final year, but I am very proud to have completed my degree and particularly proud of the 1st I received for my dissertation ‘Identity Crisis: What is Contemporary Jewellery and How Do We Define it?’.

At the degree show I was awarded the opportunity to exhibit with the Gloucestershire Guild of Craftsmen. The exhibition was held at the Town Hall in Chipping Campden in August. It was a great success and I received lovely feedback.

img_0131
To top it all off, in October I found out I had been chosen as runner-up for the Guild of Enameller’s Bursary Award and because of this I now have an image of my work published in the current issue of Craft&Design magazine.

craftdesign

Snowdrops – Now is the Time!

Now is the time to buy my Snowdrop jewellery from Henryka with 30% off all orders over £30 and free delivery! Use code 3030.
Ends tomorrow so get buying!
11115996_10153755838713056_2121134721_n

11160171_10153755838658056_1127324141_n

See all Snowdrop items here:
http://www.henryka.co.uk/catalogsearch/result/?q=snowdrops

Stepwells Body Piece

This body piece was a pain to make! These photos are from before I oxidised the components, making them black, when I was working out how to wire the whole thing.1
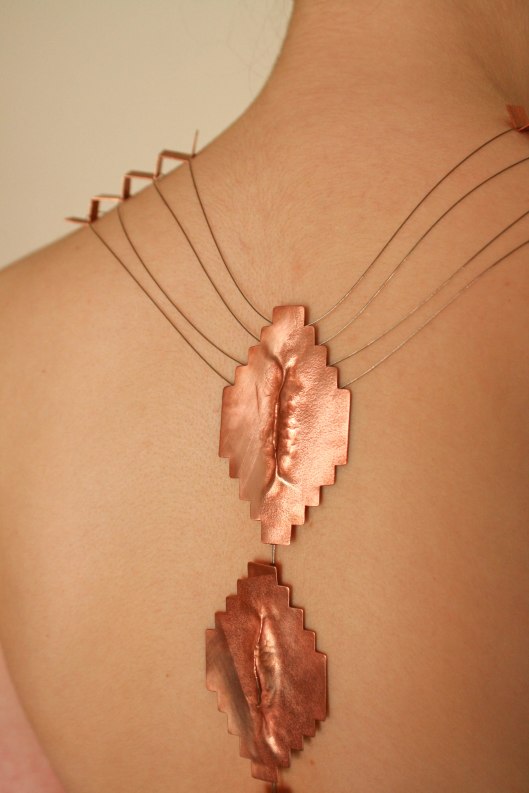
The shapes I have used are based on the Stepwells of India.

There are no photos of the front of the body piece at this stage as it was actually taped on with masking tape!
2What is sad is that to get the piece done in time for our exhibition I had to re-wire it directly onto my mannequin… meaning if I ever want to remove it or use the mannequin for something else I will have to cut the wires! I have plans to try to save it though.3This piece was actually very interesting when left with its natural copper colour. It almost becomes part of the skin.

I wont be posting again in a while as I am away on holiday. However, when I am back I plan to post some more of the work leading up to this piece.

End of Year 2!

I have finally come to the end of my second year. You can probably tell it was incredibly busy and stressful by the slowness of my posts.

Since Christmas I have done work experience at 3 different placements, I have  helped curate my class’s exhibition and I made a body jewellery piece, that went into that exhibition, which I am very pleased with. For that final project I received 68 – a strong 2:1.

Here is me with my work at our ‘MidPoint’ exhibition:
11288442_10206942630473053_446302367_o11297064_10206942629633032_52939177_o11348597_10206942629873038_65549335_o
To see more from this exhibition go to my dad’s blog here:
https://stillwalks.wordpress.com/2015/06/15/degree-shows-a-week-of-art/

(You can also see some of the work from Hereford’s degree show on his blog here:
https://stillwalks.wordpress.com/2015/06/18/hereford-degree-shows/)

I do intend to post more myself but I am going away in 2 days and won’t be able to post in a while. I may try to schedule a couple of posts before then.

The photos in this post were taken by Claire Smout:
https://www.facebook.com/clairesmoutphotography?fref=photo

Midpoint – Exhibition Madness

I haven’t posted anything from my current project yet, things have just been too crazy! It’s been crazy partly because my class has been organizing an exhibition.

Next week our exhibition Midpoint opens. Come see the diverse work of 14 crafts students. There will be work in metal, ceramics, wood, resin. glass and textiles.
11137148_498456176975179_7003481680261904513_nIf you want to see a sneak peek then check us out here on Facebook.

Snowdrops

Do you like snowdrops?

Before Christmas my class took part in a competition to design a range of jewellery for Henryka, a silver and amber jewellery shop based in Hereford.

I was one of the chosen winners! And now my Snowdrop designs are for sale in the Henryka shop.
PH803-M Hannah Medium PendantOf the snowdrop jewellery designed by me and made by Henryka, there are brooches, pendants and earrings. The pendants come in three sizes and the brooches in two.PH803-A Hannah Small Snowdrop pendantAll of these pieces can be bought on the Henryka website: http://www.henryka.co.uk/catalogsearch/result/?q=snowdropsEH803 Hannah Snowdrop earrings exclusive

Pinched and Creased

This is the last post I am going to do on my metal folding project. In the end I did 70 samples all together. I’m just showing you the best and most interesting ones.

These examples include the last couple of techniques I used. They are more of the decorative kind than structural.
IMG_3876IMG_4272
This next one was done using the fold forming technique where you fold the metal around a thin strip of metal, then feed it through the rolling mill multiple times till the whole thing is the same thickness. This causes the part with the metal strip to stretch and curve. When you unfold the metal it then has a curved raised fold through the centre.
IMG_4283This was a very interesting technique to experiment with – I tried using different widths of metal for the strip inside as well as cutting the strip of at different points – however I am not sure I actually like this effect.IMG_4284This last technique is currently my favorite. It is called a pinched line fold. The metal is folded in half by hand and then hit just behind and then upon the fold in the centre with a hammer. This stretches and thins the metal at this point so that when the metal is unfolded there is a thin and gradual raised bit in the centre.IMG_4305IMG_4306IMG_4313This technique produces a pinched and creased affect which is aesthetically interesting both front and back.IMG_4315The most interesting thing about all of these techniques, as part of this project, is that they can’t be reproduced in paper – they are unique to metal.

I hope to use the pinched line technique in my next project, I will be posting about it soon.

Two Folds

These are developments of my metal folding experiments, using the wire scoring technique and testing out the effectiveness when doing more than one fold within a square.

Parallel Folds:
IMG_3979IMG_3985Not only did I test the effectiveness of this technique when folding the metal twice but I also compared the results of this with both straight and curved folds.
I found the straight folds to be easier to control as you can use the edges of steel blocks and other tools to shape the corners around. With curved folds this is not possible, once one scored line is folded it is difficult to fold along the other.

Meeting Folds:IMG_4035IMG_4023Having said that curved folds were harder I actually found them easier in the meeting lines samples. The metal bent along the lines easily and naturally.
I am starting to understand the nature and limitations of folding metal but it is something which can only be learnt from experience and I still have a long way to go.

Crossing Folds:
IMG_4004IMG_4005IMG_4011This idea of crossing folds was an interesting one. If this was attempted in paper it would not hold any shape, it can not be bent both ways at the same time. However, metal is much stiffer and holds it shape. By working the folds a few times I was able to create this more decorative form with subtler folds.
It was much easier and a bit more effective with the straight lines but the curved lines one is still interesting.

Other:
IMG_4052IMG_4055I did a few more samples with two folds, including ones which combined straight and curved lines, but this was the most successful one. Like the curved meeting folds sample it bent naturally along the scored lines and created a smooth form which was very pleasing to the eye.

Paper to Metal

A large part of why I chose to explore folds in metal was because of how much work I have done in the past with paper. During both my Foundation year and the first year of my degree I did a lot of work in paper, card and acetate. In my latest project, making the corridors, I made lots of maquettes in different papers and cards but then struggled in understanding how to replicate these forms in metal.

I did succeed in making my ‘corridors’ in metal however I felt that to push the designs forward and make more varied pieces, like I had in paper, I would need have a better understanding of how differently metal and paper need to be treated.

Therefore, it made sense to do a section of my metal folding project comparing the results of a few paper-folding techniques in both card and brass.
1With both the card and metal I scored the lines first and then bent along them accordingly. I used the wire scoring technique to do the brass samples.
With this first form I found the results to be very similar.
234With this second paper-folding technique I had to work a lot harder on the metal however the result was still very similar the only significant difference being the loss of the point in the centre of the metal where all the lines meet.5678With this last pair the results were really quite different. Again, the main difficulty was with recreating the point in the centre where all the lines meet. Although this was the least successful in the recreation the result was still interesting and effective.910During the project I didn’t have time to test out these techniques in copper but I would still be interested in comparing the results as copper is so much softer than brass.

Folding Metal

It was very nice to arrive back at Hereford after a fantastic trip to Paris to then be able to go straight to my laptop to find out that I received 80 on my most recent project on folds in metal.
IMG_3949This project was about exploring a technique or process, to become an expert in it and push the boundaries. I chose folds in metal due to this project starting half way through the gallery one, by that point I knew folds were going to be involved so one project could inform the other. This helped a lot in the creation of my ‘corridors’.IMG_3946To start my investigation I had to research and test out simple techniques of scoring and folding metal. These first three images show a square of copper I scored be hand using a scribe and needle files. This was the most time-consuming process, however, it was also the one that produced the best sharply angled fold.IMG_3944To produce the fold in this square of brass I used the planish scoring technique, hitting the metal with a hammer against the sharp edge of a steel block. This produced a similar fold to the hand scoring technique, yet it was much quicker. However, it was harder to control and marked the metal slightly. A very crisp edge is needed!IMG_4218After initial tests I used the wire scoring technique, shown in the final two images, to experiment more playfully. This technique does not produce as sharp edges, however, it is fairly quick and very good for creating curved folds.IMG_4251IMG_4158A lot has happened this past week; visiting Paris for a few days, receiving my result for Advanced Processes, celebrating my 21st birthday and doing my first day of volunteering at Mission Gallery. Crazy!