Mission Gallery Showcase

Hannah Duncan Contemporary Jewellery can now be seen at Mission Gallery, Swansea.


The showcase is made up of most of my degree work plus a few new smaller necklaces and earrings. It is going to be on display for the duration of the current exhibition being held there – Situation/Material/Ocean. My work sits well next to this exhibition as it is based on coastal landscapes.


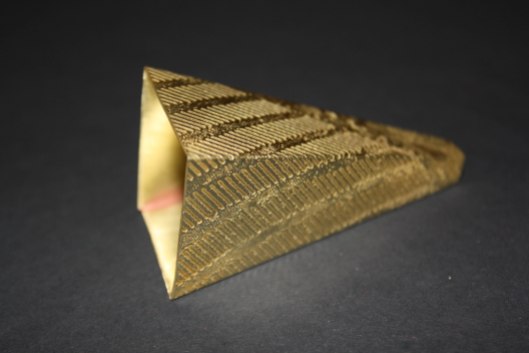
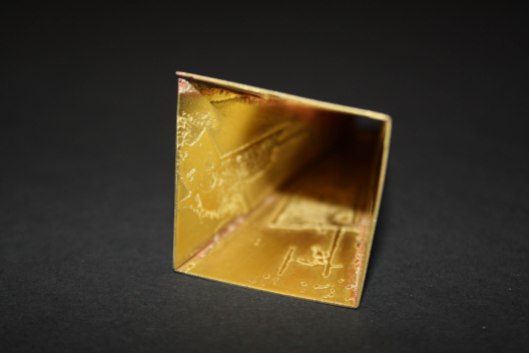
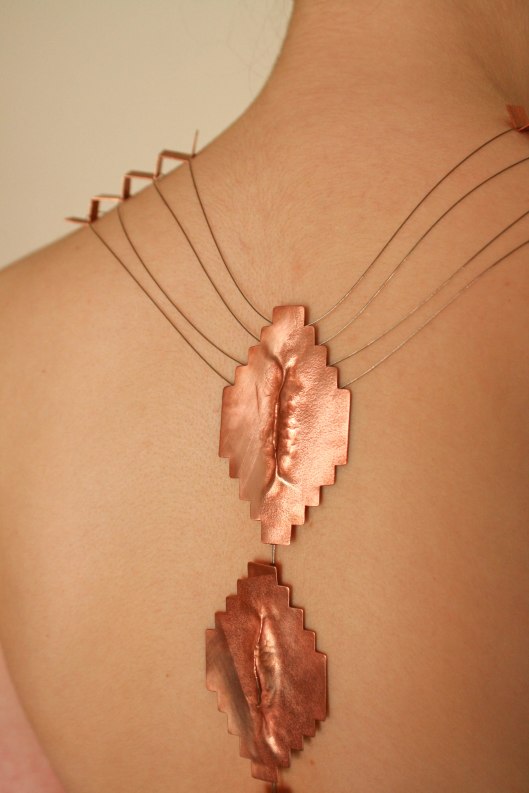
Having grown up in Swansea, as well as regularly visiting the south-west coast of Scotland, I have developed a love for the coast. This work combines enamelled silver and copper with fold-forming techniques and tangles of threads. The contrasting shapes and tactile surfaces are also used to embody the coastal landscape. My jewellery is an attempt to capture the beauty of this landscape and also immerse the wearer in the atmosphere of the shoreline.


So, if you’re in Swansea why not drop into Mission Gallery and check out the current exhibition and my work in the craft area. And while you’re at it why not treat yourself to a necklace or pair of earrings.


Stepwells Body Piece

This body piece was a pain to make! These photos are from before I oxidised the components, making them black, when I was working out how to wire the whole thing.1
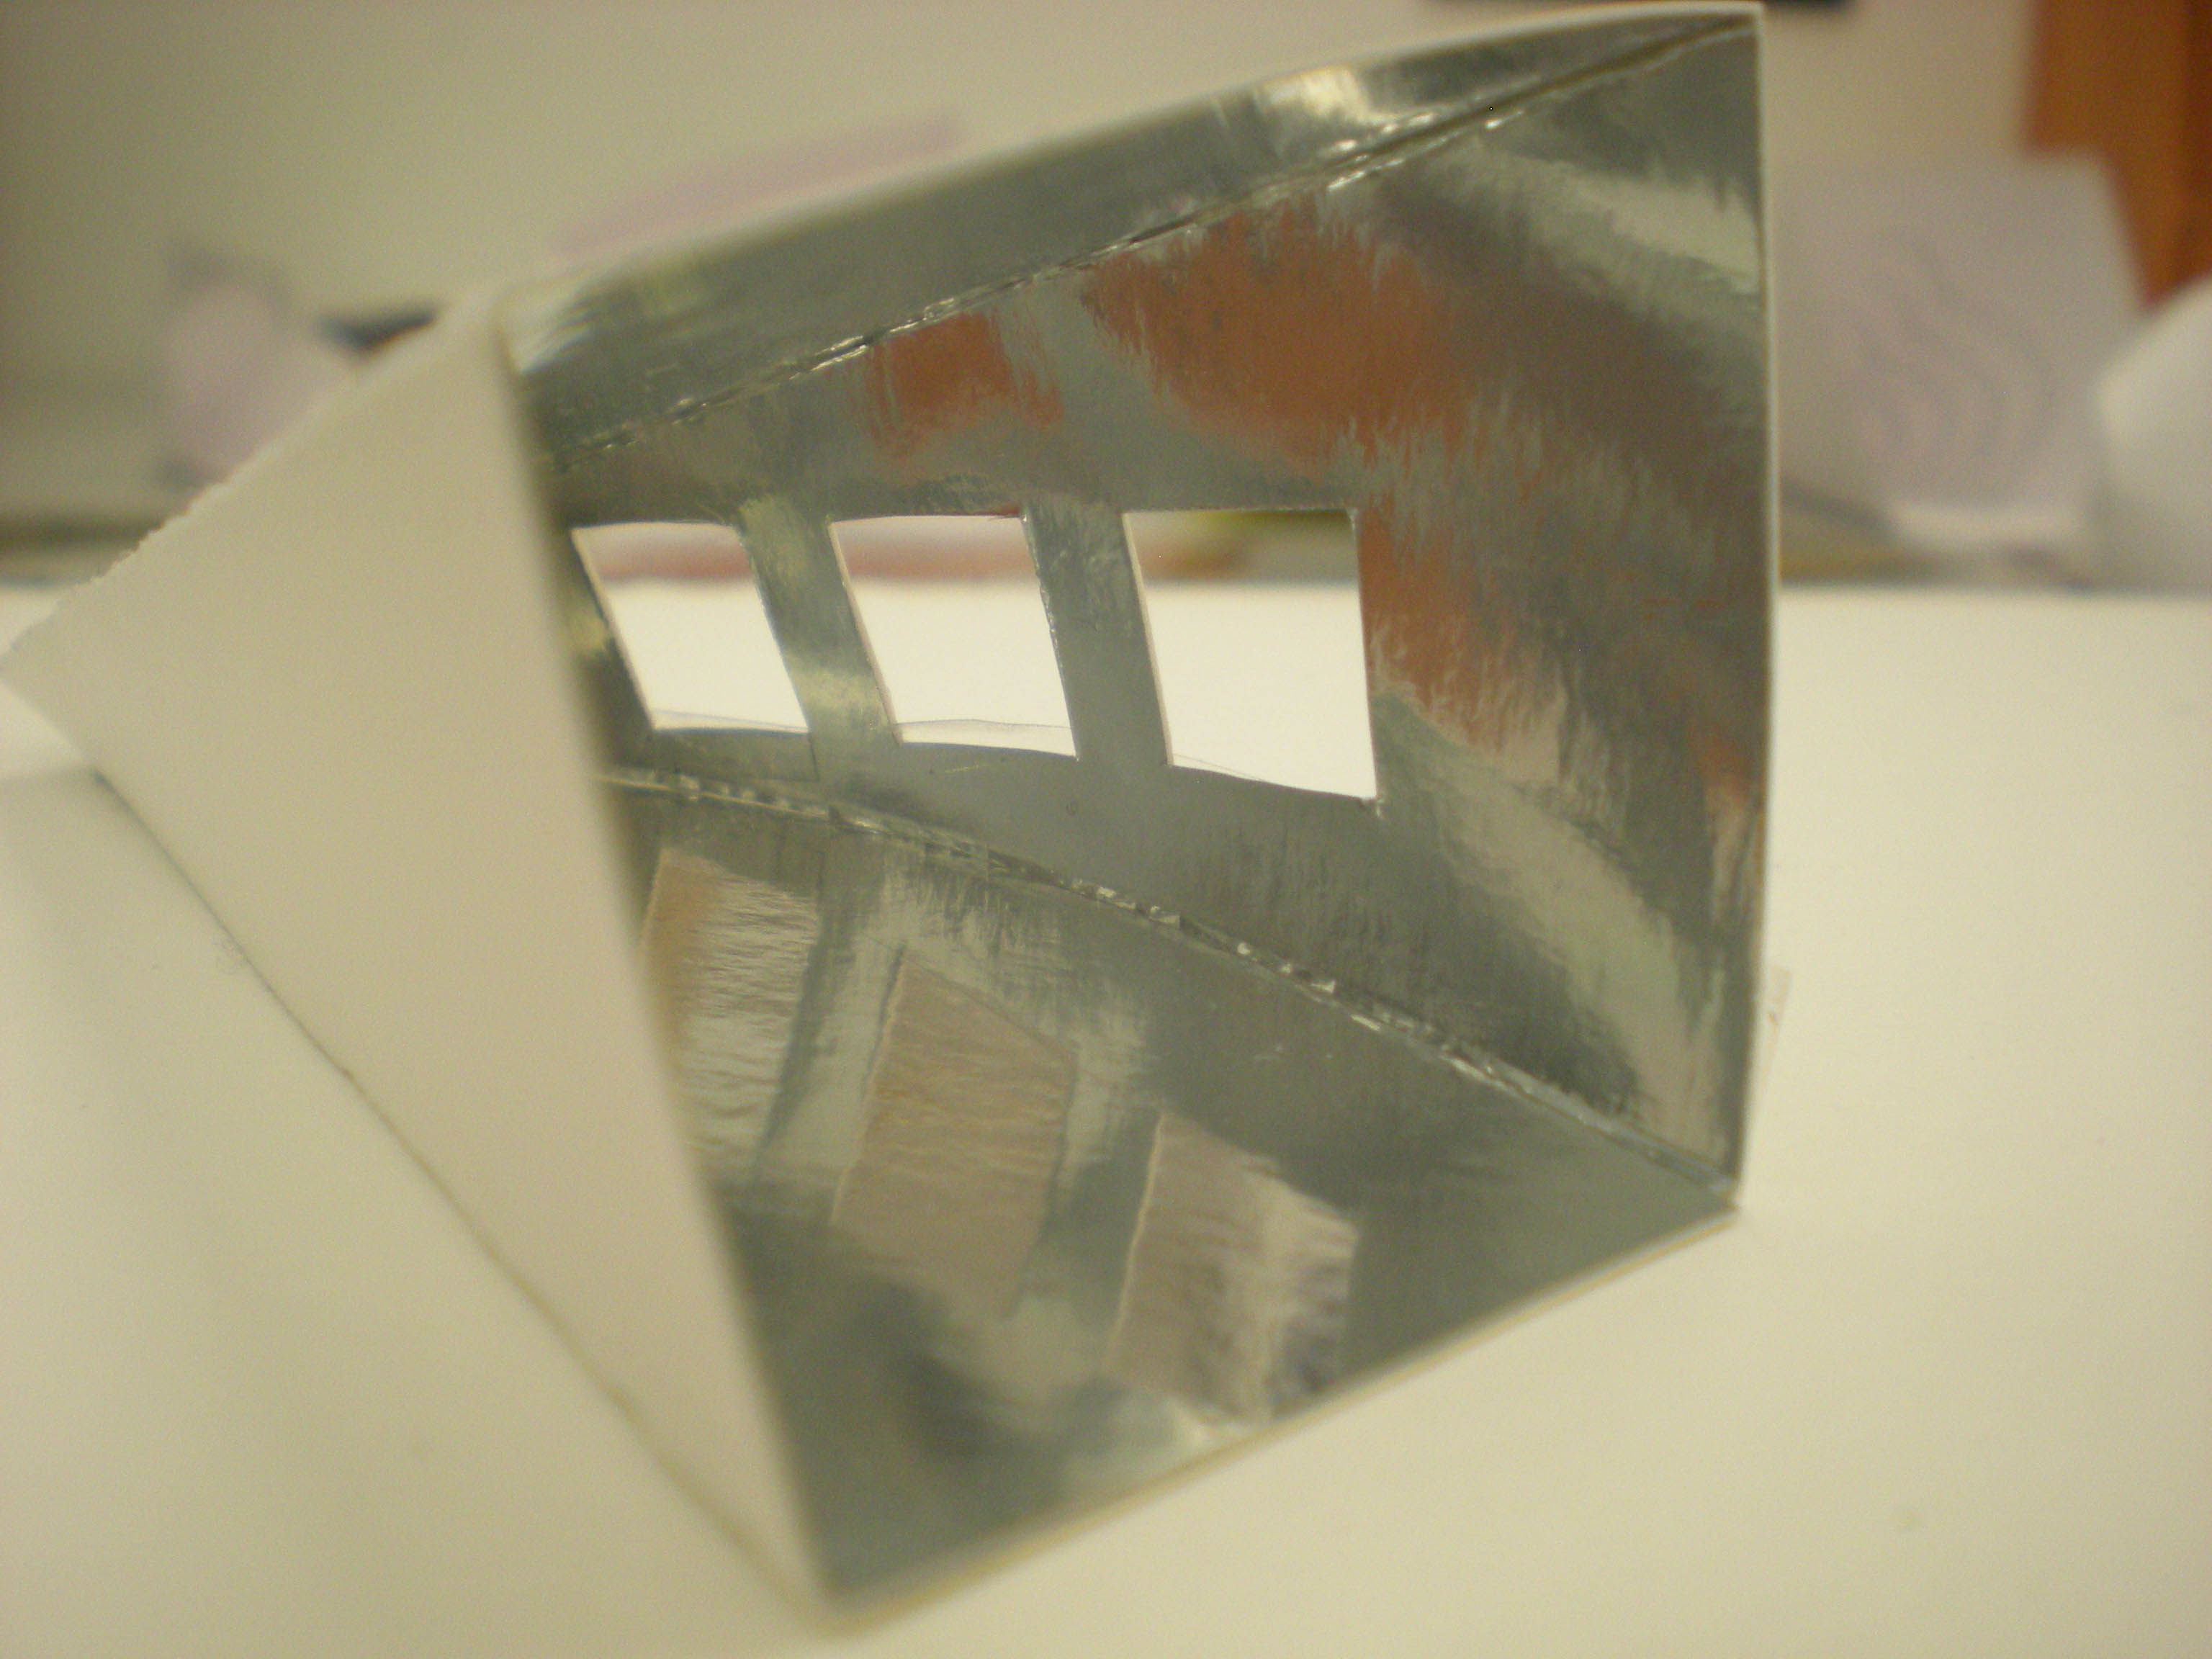
The shapes I have used are based on the Stepwells of India.

There are no photos of the front of the body piece at this stage as it was actually taped on with masking tape!
2What is sad is that to get the piece done in time for our exhibition I had to re-wire it directly onto my mannequin… meaning if I ever want to remove it or use the mannequin for something else I will have to cut the wires! I have plans to try to save it though.3This piece was actually very interesting when left with its natural copper colour. It almost becomes part of the skin.

I wont be posting again in a while as I am away on holiday. However, when I am back I plan to post some more of the work leading up to this piece.

End of Year 2!

I have finally come to the end of my second year. You can probably tell it was incredibly busy and stressful by the slowness of my posts.

Since Christmas I have done work experience at 3 different placements, I have  helped curate my class’s exhibition and I made a body jewellery piece, that went into that exhibition, which I am very pleased with. For that final project I received 68 – a strong 2:1.

Here is me with my work at our ‘MidPoint’ exhibition:
11288442_10206942630473053_446302367_o11297064_10206942629633032_52939177_o11348597_10206942629873038_65549335_o
To see more from this exhibition go to my dad’s blog here:
https://stillwalks.wordpress.com/2015/06/15/degree-shows-a-week-of-art/

(You can also see some of the work from Hereford’s degree show on his blog here:
https://stillwalks.wordpress.com/2015/06/18/hereford-degree-shows/)

I do intend to post more myself but I am going away in 2 days and won’t be able to post in a while. I may try to schedule a couple of posts before then.

The photos in this post were taken by Claire Smout:
https://www.facebook.com/clairesmoutphotography?fref=photo

Paper to Metal

A large part of why I chose to explore folds in metal was because of how much work I have done in the past with paper. During both my Foundation year and the first year of my degree I did a lot of work in paper, card and acetate. In my latest project, making the corridors, I made lots of maquettes in different papers and cards but then struggled in understanding how to replicate these forms in metal.

I did succeed in making my ‘corridors’ in metal however I felt that to push the designs forward and make more varied pieces, like I had in paper, I would need have a better understanding of how differently metal and paper need to be treated.

Therefore, it made sense to do a section of my metal folding project comparing the results of a few paper-folding techniques in both card and brass.
1With both the card and metal I scored the lines first and then bent along them accordingly. I used the wire scoring technique to do the brass samples.
With this first form I found the results to be very similar.
234With this second paper-folding technique I had to work a lot harder on the metal however the result was still very similar the only significant difference being the loss of the point in the centre of the metal where all the lines meet.5678With this last pair the results were really quite different. Again, the main difficulty was with recreating the point in the centre where all the lines meet. Although this was the least successful in the recreation the result was still interesting and effective.910During the project I didn’t have time to test out these techniques in copper but I would still be interested in comparing the results as copper is so much softer than brass.

Folding Metal

It was very nice to arrive back at Hereford after a fantastic trip to Paris to then be able to go straight to my laptop to find out that I received 80 on my most recent project on folds in metal.
IMG_3949This project was about exploring a technique or process, to become an expert in it and push the boundaries. I chose folds in metal due to this project starting half way through the gallery one, by that point I knew folds were going to be involved so one project could inform the other. This helped a lot in the creation of my ‘corridors’.IMG_3946To start my investigation I had to research and test out simple techniques of scoring and folding metal. These first three images show a square of copper I scored be hand using a scribe and needle files. This was the most time-consuming process, however, it was also the one that produced the best sharply angled fold.IMG_3944To produce the fold in this square of brass I used the planish scoring technique, hitting the metal with a hammer against the sharp edge of a steel block. This produced a similar fold to the hand scoring technique, yet it was much quicker. However, it was harder to control and marked the metal slightly. A very crisp edge is needed!IMG_4218After initial tests I used the wire scoring technique, shown in the final two images, to experiment more playfully. This technique does not produce as sharp edges, however, it is fairly quick and very good for creating curved folds.IMG_4251IMG_4158A lot has happened this past week; visiting Paris for a few days, receiving my result for Advanced Processes, celebrating my 21st birthday and doing my first day of volunteering at Mission Gallery. Crazy!

Now or Never

I think it’s a case of now or never with this post! I finished this project quite a while ago now and another deadline has come and gone without me posting any finished pieces.

So here we go:IMG_3165In the end I made both objects and jewellery (there are two other pieces than these but I feel these are the most successful).IMG_3161IMG_3188I am really pleased with these but working out the best way to make them was hell! If I’d had the time I would have liked to make more varied ‘corridors’ with steeper curves and different lengths of edges. I was also planning on blackening the insides of some.14IMG_3186IMG_3183IMG_3174This is one of the necklaces, however it’s actually inspired by the bricks of MIMA rather than corridors. It’s simple but effective and I rather like wearing it myself.IMG_3215
After a very stressful finish to this project I managed to scrape a first! Woo!

Anyway, I’m off to Paris for a few days. I will try to be less useless once I’m back and post some examples from my Metal Folds project which finished earlier this week and will hopefully have my results for it as soon as I’m home.

Optical Illusions

Another idea I played with during my Gallery project was that of optical illusions. This was inspired by the illusions which can be seen in MIMA’s cafe. See the photos my dad took of these illusions here.DSCN0491I tried to incorporate the illusion of a circle within my corridor forms, although those forms became pyramids as I closed off the narrow end. I started by drawing the circles, working out how to change the curves to create the illusions, by eye.DSCN0493Soon after, I worked out how to create a net pattern on Photoshop to get a more accurate circle. Once I had this figured out I was able to change the shape and positioning of the illusion.

Oval:DSCN0585DSCN0592Off-centre circle:DSCN0658DSCN0661However, I then wanted to incorporate the earlier idea of curving one of the edges of the form but this proved much more difficult. I simply couldn’t work out how to alter the circle’s curves to accommodate for the curved edge and still create a perfect illusion of a circle. I attempted drawing it by hand (below) but gave up all together on Photoshop.DSCN0489DSCN0579Another aspect of these objects which proved tricky was photographing, or even seeing, the illusions. You have probably noticed that the illusions don’t actually seem to work in any of these photos but I promise that it is because they don’t photograph well. If you were to see them in reality you’d be able to tell that they do work, well, they do as long as you squint or hold them at a distance… haha. Maybe I’ve just been looking at them for too long!

Image and Reflection

My most recent project – the gallery one – actually came to an end over a week ago and I have even had my mark back awhile.

However, I have only done 2 posts about this project so far. Which is a pity as I have been really pleased with the work I have produced and the ideas I have been working with. Therefore, I am not going to post photos of my final work or tell you what mark I got just yet. I hope to post some more work that led to the projects conclusion first.

So, here are some more images of the paper pieces I made, experimenting with pattern and surfaces.
DSCN0368These were done using printed photos of the Mission’s interior. I like the subtle colour changes and how the folds change the intersecting lines of the images.DSCN0387DSCN0389DSCN0386
I then bought some Silver card (or mirror paper) to create reflections inside these corridor forms.DSCN0528I tried changing aspects to see how this changed the reflections. In this next one I used the mirror paper on only one side whilst colouring in the opposite section. This created the appearance of an extra two sides or, as I see it, a path.
DSCN0520Finally, I tried cutting out windows. This created a repeat pattern and obviously allowed more light inside the ‘corridor’.DSCN0523DSCN0524

Happy New Year

Well Happy New Year everyone! I hope you all had a great night last night as well as a fantastic Christmas.DSCN0393These are pictures of another of my paper ‘corridors’. Again it is inspired by John Pym’s installation “Penumbra” but with this one I have also focused on the iconic windows of Mission Gallery.DSCN0394 These ‘corridors’ are great for looking at from various angles, changing the perspective alters how they appear quite a lot.DSCN0397 I particularly like this one, I’m not sure why, but at least a part of it is the use of black paper. Although it is all black the windows allowing light through still create different shades and depth.DSCN0398

Paper Corridors

Wow! So far second year has been unbelievably busy (part of the reason for the lack of posts). I have been working on 3 projects and an essay, all running at once! Luckily one project and the essay are over and done with now and I got 82 on my essay, a fantastic mark, giving me a first. Yay!

My main brief at the moment is to design and make a collection of work based on a specific museum or gallery of our choice. The idea is that the products we create would be sold in the shop of the museum or gallery.

I have chosen two galleries to base my work upon; Mission Gallery and MIMA.
I have been making lots of paper objects based on aspects of both galleries. These first ones were inspired by Mission Gallery’s building and the John Pym exhibition ‘Penumbra‘.
DSCN0498

With these I was creating miniature corridors, joining curved and straight edges, and playing with ideas of perception of space, sense of depth and light and shadow.DSCN0499DSCN0504DSCN0507DSCN0508DSCN0511